Transcript Example (with Microsoft Word and PDF Templates)
This resource includes a transcript example from an interview, formatted in several different ways:
- Clean verbatim style
- True verbatim style
- Timestamps at regular intervals
- Timestamps at speaker or paragraph intervals
I made these .docx and PDF example transcripts for university students, educators, non-profits, journalists, podcasters, filmmakers, and transcriptionists.
Quick tip: If you’re not using it already, you can install free transcription software like Express Scribe to help you manually transcribe interviews much faster. The software lets you control audio playback using hotkeys so you don’t have to keep starting and stopping audio with your mouse.
If you want to go really fast, I also recommend getting a transcription foot pedal (I use the Infinity pedal). Together, these two tools will save you hours upon hours of transcription time. (Or learn more about our interview transcription services.)
If you’re a professional content creator, you may also be interested in our posts about AI-powered tools for scaling up your audio and video production workflow:
Now, on to the transcript examples!
This post may contain affiliate links. See my disclosure for more info.
Interview transcription format sample for Microsoft Word
Download this transcription format template for Microsoft Word for use with interviews and qualitative research projects:
Interview Transcription Template – Word (.docx)
Clean verbatim vs. true verbatim transcript examples
There are two main styles of transcription used in interviews and qualitative research:
- Clean verbatim (also called intelligent verbatim or non-verbatim).
- True verbatim (also called strict verbatim, or simply “verbatim”).
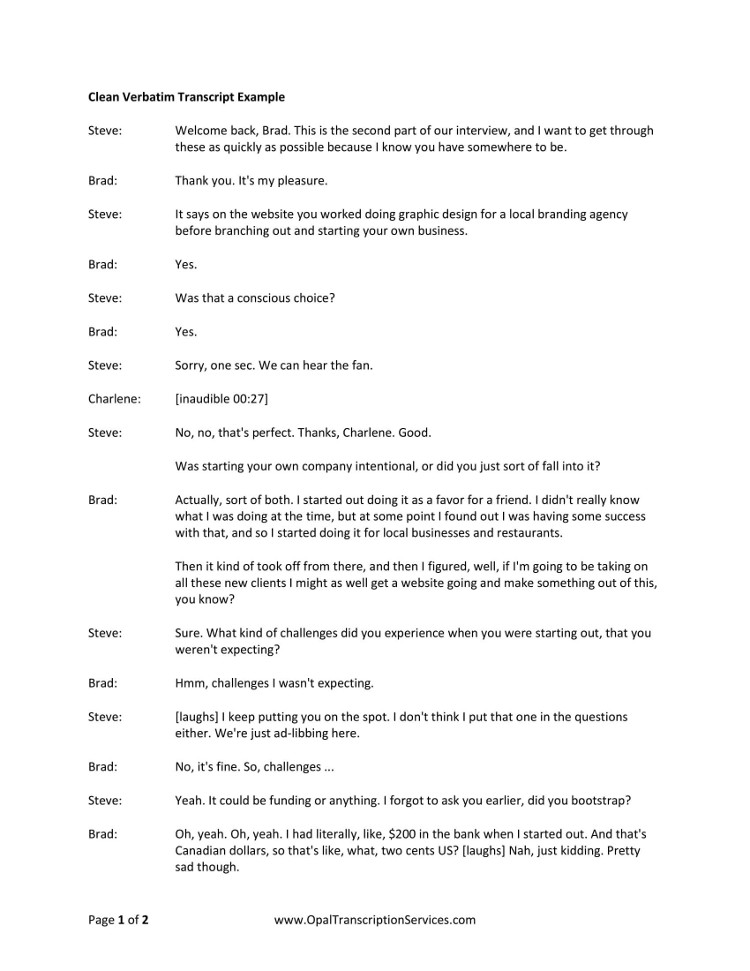
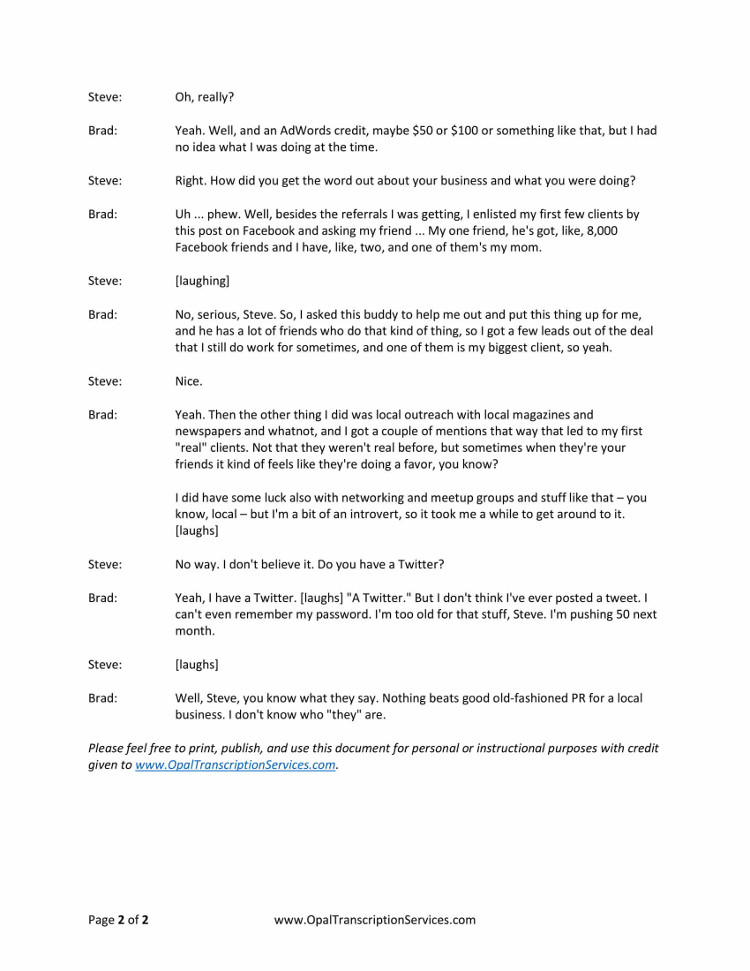
A clean verbatim transcript is a lightly edited version of the original audio. Typically, the following elements are removed:
- Stutters
- Filler speech, including “um,” “uh,” etc.
- Most non-speech sounds, including coughing and throat clearing
- False starts
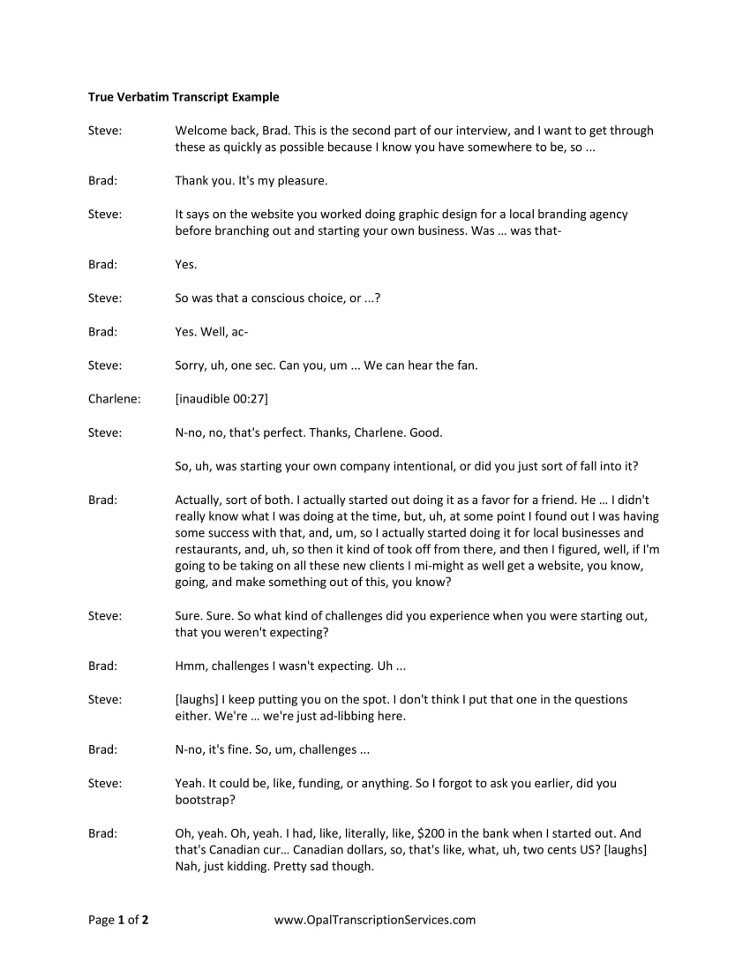
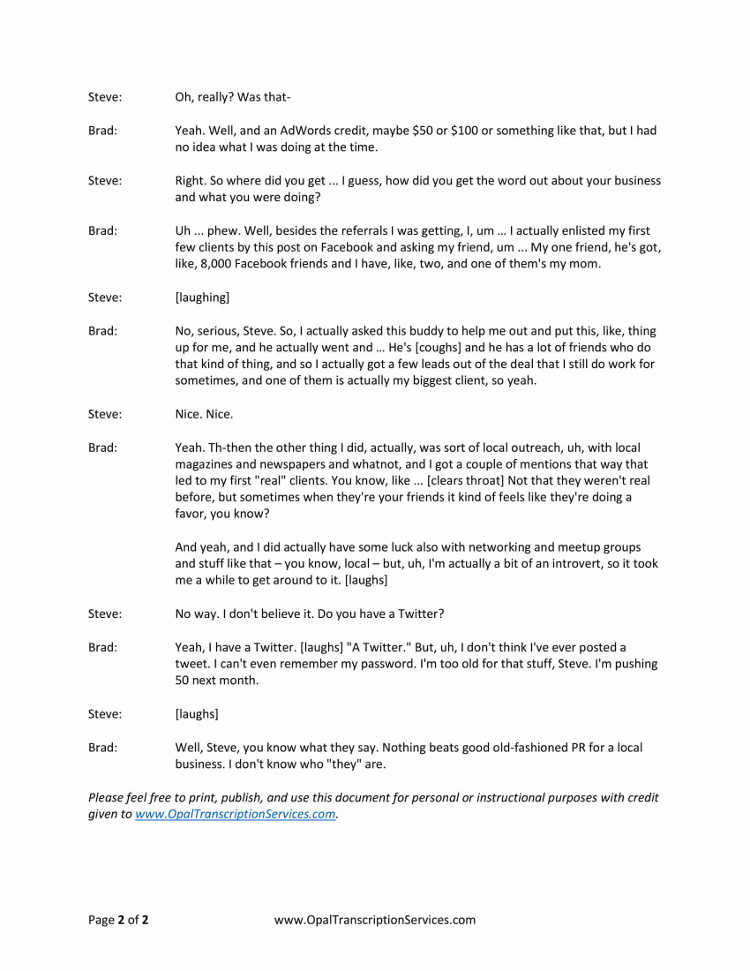
A true verbatim transcript, on the other hand, attempts to capture every utterance of the speakers. These include stutters, meaningless filler speech, and false starts. Verbatim style may also include non-speech and background sounds, such as coughing and sneezing or a door closing.
While each transcription style is useful under certain circumstances, clean verbatim is used most often because the transcripts cost less and are easier to read.
However, true verbatim may be desirable for certain qualitative and market research projects and legal investigations, where it’s necessary to study not only what was said, but also the manner in which something was said.
Below, I’ve included examples of an interview transcribed in both verbatim and clean verbatim fashion.
Example transcript in true verbatim style
Here’s a sample interview transcript that demonstrates the true verbatim style:
Download the PDF version here:
Interview Transcript Example – True Verbatim (PDF)
Example transcript in clean verbatim style
And here’s the same conversation from above, transcribed in clean verbatim:
Download the PDF version here:
Interview Transcript Example – Clean Verbatim (PDF)
We made the following changes to the second (clean verbatim) transcript:
- We edited out stutters, partial words, and short incomplete sentences.
- We removed meaningless instances of words like “so” at the start of sentences, and “like” when used as filler speech. (However, we left in the word “like” where removing it would have made the meaning literal when it wasn’t intended to be – i.e., when Brad refers to his “like, two” Facebook friends.)
- We chose to leave in the laughter, as it helps capture the overall tone of the interview and the banter occurring between the speakers. We also left in nonsense exclamations like “Uh … phew,” because it helps set the context for what follows. However, we removed other non-speech sounds like coughing and throat clearing that do not contribute anything useful to the content.
- In this particular example, we opted to remove repetitive instances of the word “actually” spoken by Brad, the interviewee. Normally we leave longer words in, but in this case we felt it was a speaker idiosyncrasy that distracted from the content of the interview.
Clean verbatim style is not an exact science, and sometimes there may be overlap between non-verbatim and verbatim styles in a transcript. All in all, the changes we made here make for a cleaner, less distracting, and more valuable interview – without detracting anything meaningful from the original.
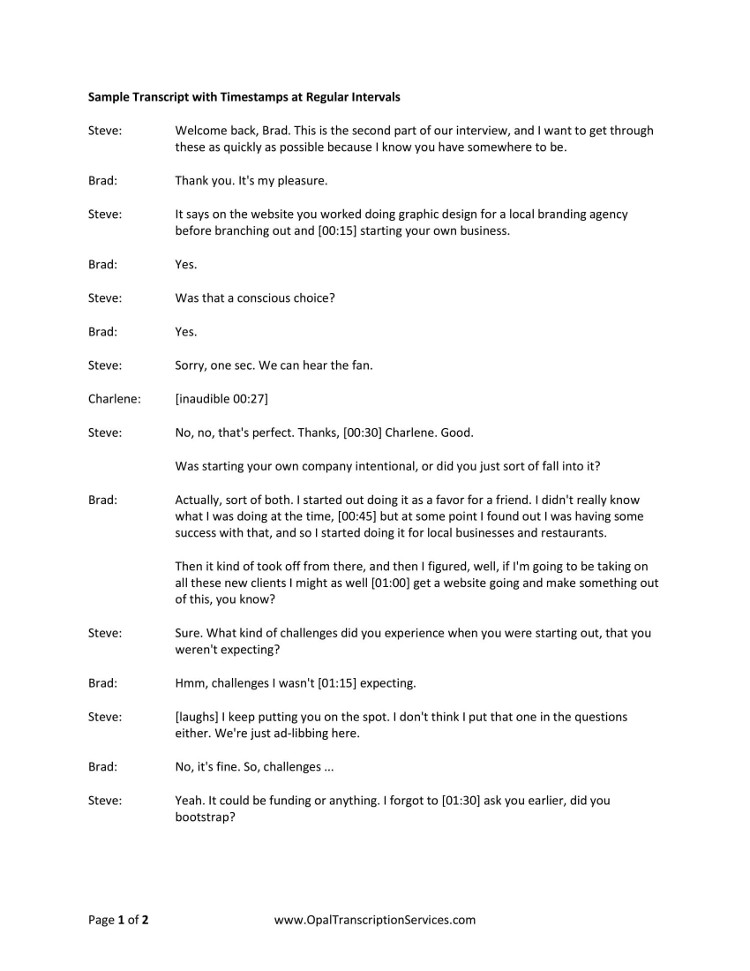
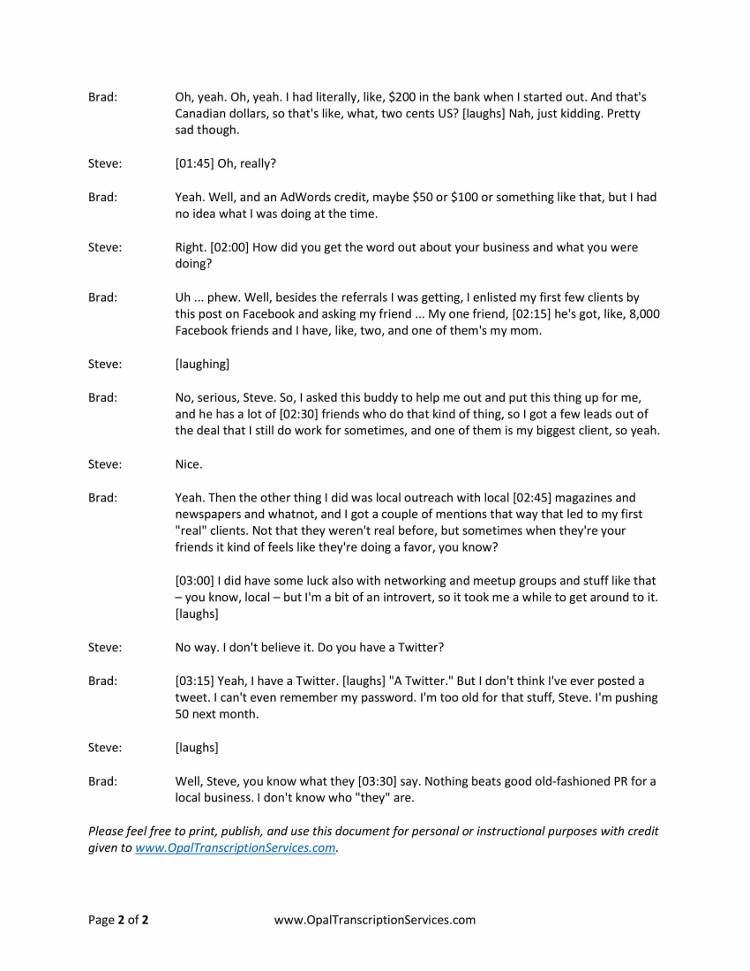
Sample transcript with timestamps at regular intervals
Some projects require timestamps to be placed at regular intervals in the transcript so the audio can be easily referenced later.
Below is an example of an interview transcript with timestamps:
Download the PDF version here:
Interview Transcript Example – Timestamps at Regular Intervals (PDF)
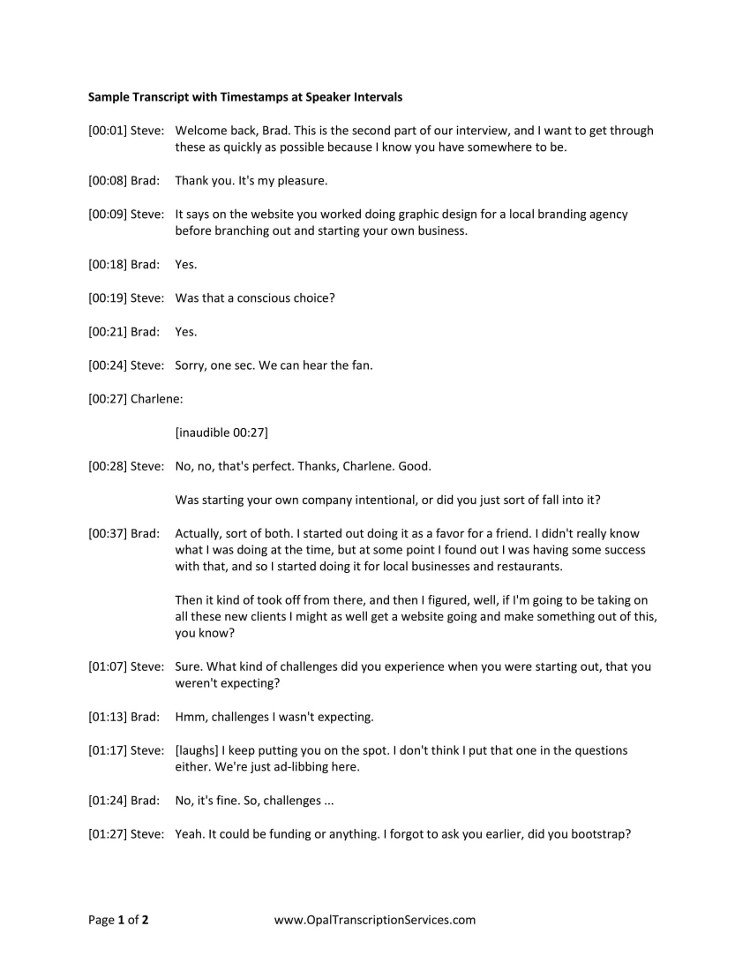
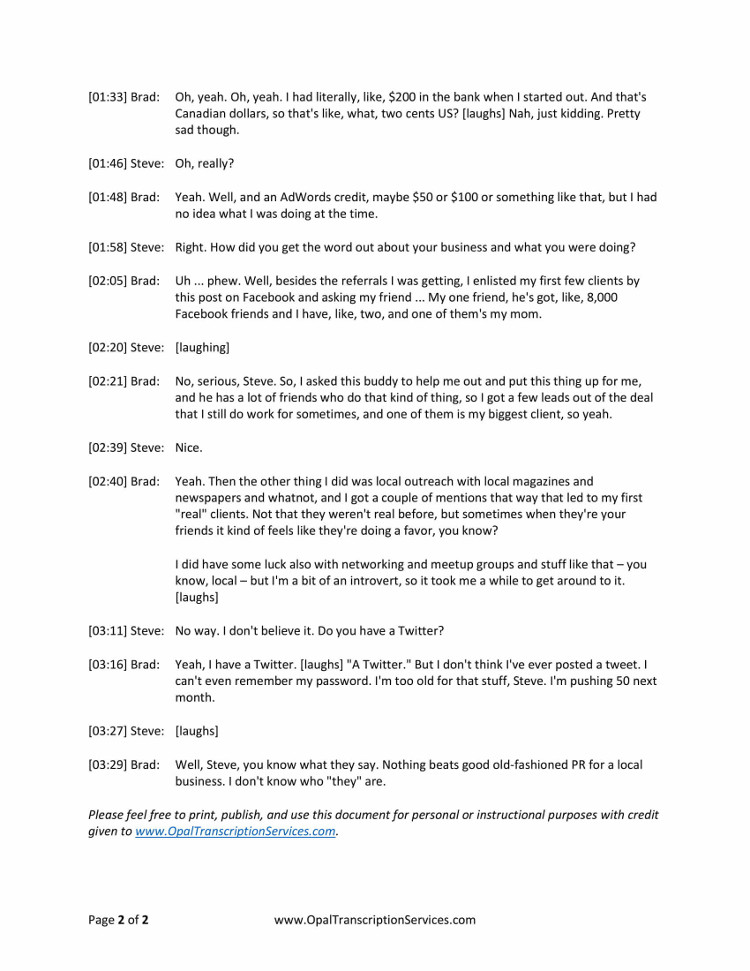
Sample transcript with timestamps at speaker intervals
Another way to timestamp a document is to place the timecode markup at speaker or paragraph intervals, like in the following interview transcript sample:
Download the PDF version here:
Interview Transcript Example – Timestamps at Speaker Intervals (PDF)
Transcript format tips
There are several formatting elements common to most transcripts. These include speaker labels, timestamps, inaudible and crosstalk tags, and markup for external sounds. Let’s look at how to handle each of these:
Speaker labels. Speakers are typically identified by first name, full name, title, or role. They can also be identified by generic descriptors, like “Male” or “Female,” when other information isn’t available.
In the above examples, the speakers’ names have been offset from the rest of the transcript for better readability. To use this formatting in your own transcripts, download the .docx template at the top of this article.
Timestamps. Timestamps, e.g. [01:27], can be placed at regular intervals such as every 15 or 30 seconds, or they may be placed at the beginning or end of each paragraph or speaker. Examples of each style are shown above.
Inaudible tags. When words or phrases are unclear, mark them out with a timecode; e.g., [inaudible 00:27]. You can also include guesses (phonetic or otherwise) as to what was said – for example, [wing yard 00:27].
Crosstalk tags. When two or more speakers are talking at the same time and it’s impossible to hear what’s being said, use a crosstalk tag, e.g. [crosstalk 01:27].
Sounds. Non-speech and background sounds are notated in brackets; for example, [laughing] or [door slams]. No timestamp is necessary.
Finally, a note on consistency and style: It’s best to follow a style guide to ensure consistency among elements like numerals, dates, titles of works, etc. We generally follow AP style. Other common style methods include APA, MLA, and The Chicago Manual of Style.
If you’re thinking of starting a career in transcription, check out my complete guide on how to become a transcriptionist. I also recently posted this list of 75+ transcription jobs for beginners and pros.
If you have any questions about using the example transcripts above, leave a comment and I’ll do my best to help!


![6 Best AI Video Upscaling Software [Free and Paid]](https://www.mondayroadmap.com/wp-content/uploads/ai-video-upscaling-768x480.png)


![6 Best AI Video Editor Tools [Ranked and Reviewed]](https://www.mondayroadmap.com/wp-content/uploads/ai-video-editors-768x480.png)
thanks a lot for this. I appreciate th above lessons. at the moment lets keep the above into practice.
Dickens,
You’re very welcome! I’m glad you found it useful.
Useful
Very very helpful. For sure, God bless you.
Thank you. I’ve recently launched my own company in ghostwriting & editing, and typing & transcription services. These tips are GREAT reminders. God bless you.
Thank you, Mrs. Owens!
Handy for a beginner like me.
Thank you very much, really help me to do my assignment
I’m glad to hear that!
Hello, I don’t know how to thank you ,these instructions are very helpful and useful and real ,and how to contact you if I need any help.
Hemza,
I’m so happy you enjoyed the post! While I’m not always available to respond directly to questions, I always appreciate receiving suggestions about what kind of content you’d like to see me write about in the future. So if there’s a particular topic you have in mind, please feel free to reply and let me know. Thanks so much for commenting!
Your information is very valuable. My problem is, I need to find a resource that tells me how to set up the formatting in MSWord 2016. Setting the speaker tags and margins so it all lines up. If you have any link you could direct me to, or if you can explain how you do that, I would be forever grateful.
Thanks,
Lorri
Hi Lorri,
I’ve been meaning to get a refresher on formatting myself and recently bookmarked this comprehensive tutorial on MS Word 2016:
https://www.youtube.com/watch?v=TxLuuNprjXg
I haven’t watched it yet, but there’s a clickable table of contents in the video description and it has some sections on formatting and adjusting margins. I hope it helps!
how to name an interview transcript document?
Hi Sahar,
If you’re doing the transcript for a client or professor, you should typically give the document the exact same name as its corresponding audio file; for example, “Interview with Sahar.mp3” would be titled “Interview with Sahar.docx”.
If you’re recording the audio yourself and there are a lot of files, it’s best practice to use some kind of file naming convention to keep everything organized. One easy way to do this is to use a date prefix; for example, 2019-05-30_Interview_with_Sahar.mp3.
I hope this helps!
Thank you so much for this guide. I am just about to embark on Transcription services as a full time activity and will be grateful for any mentoring and encouragement
You’re very welcome! Since you’re just getting started, I recommend visiting the following resources:
My complete guide on how to become a transcriptionist:
https://www.mondayroadmap.com/how-to-become-a-transcriptionist/
My list of 75+ companies that hire work-from-home transcribers:
https://www.mondayroadmap.com/online-transcription-jobs/
All the best in your new transcription career!
Chloe
Thank you, this was very helpful.
Glad to hear it, Cony! Thanks for commenting.
Chloe
This was really really helpful.
Thank you so much.
Thank you for reading!
Hi, I’m just getting started transcribing hours of interviews. This article is a life saver. Really helpful, accessible, clear and the .pdfs are really useful allowing me to see what the finished transcription should look like. Thank you so very much.
You’re so welcome, Shaz! Thank you for reading!