Monumetric Requirements for Publishers: How to Join
If you’ve read my recent Monumetric review where I discuss how I doubled my ad revenue after switching to the platform from AdSense, you might be interested in learning more about how to get started with this premium ad network so you can maximize your blogging income. In this post, I’ve outlined Monumetric’s requirements for publishers, as well as how the application and onboarding process works in detail.
I recommend the ad platform for small but growing blogs as well as business sites interested in improving ad revenue and automating their affiliate marketing and blogging strategy.
Let’s get started!
Monumetric requirements for publishers (Propel program)

Compared to many other premium ad networks, Monumetric accepts publishers in a broader range of categories and niches, including:
- Business and tech
- Lifestyle
- Food
- Beauty
- Fitness
- Family
- DIY
- Entertainment
Monumetric is also flexible in terms of the types of websites they can serve ads on – for instance, blogs, online magazines, business websites, forums, online aggregators and tools, etc. This is different from many other premium ad networks that only accept blog-only sites in a specific niche such as lifestyle.
For this reason, Monumetric is a great fit for regular bloggers, as well for small business owners looking to monetize their business blogs with ads. In my case, I wanted to do the latter, as my blog is part of my audio transcription agency’s domain. (I was rejected from an ad network in the past because my site was considered a “corporate” site.)
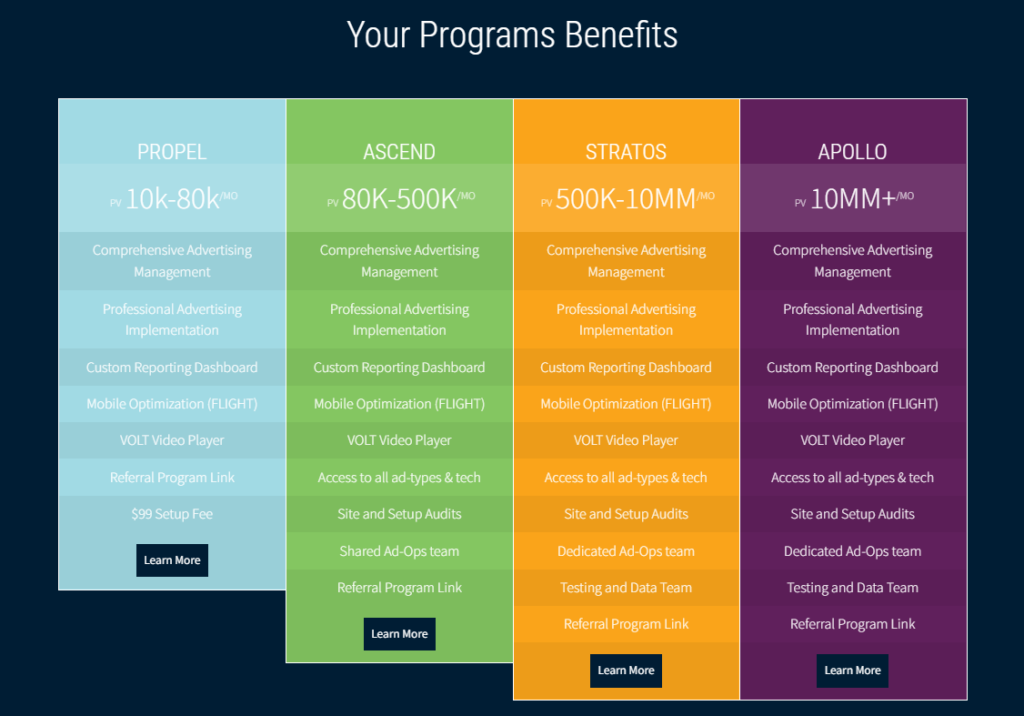
Monumetric offers four tiers of programs for publishers, all of which offer comprehensive ad management, implementation, a custom reporting dashboard, and mobile optimization. The higher tiers offer some additional benefits, such as extra ad types and specialized support.
The four program tiers are:
- Propel – for publishers with 10K-80K monthly pageviews
- Ascend – for publishers with 80K-500K monthly pageviews
- Stratos – for publishers with 500K-10 million monthly pageviews
- Apollo – for publishers with over 10 million monthly pageviews

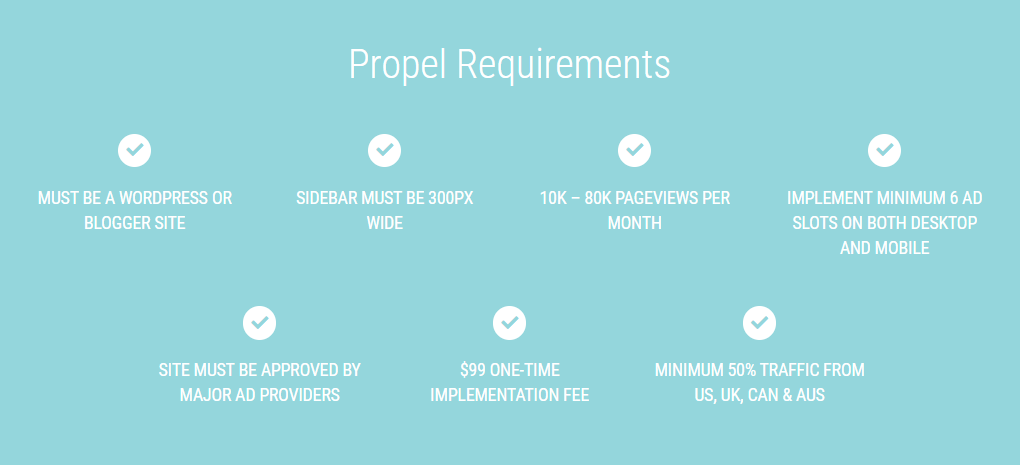
In this post, we’ll focus on the requirements for the Propel program, as this is most likely the tier you’ll be signing up for if you’re leveling up from AdSense. To join the Propel program, you’ll need to meet the following requirements:
- Have a WordPress or Blogger website. Since 64.2% of sites with a CMS use WordPress, odds are you’re good to go here.
- Have a 300px-wide sidebar. This is a standard size for WordPress sidebars. If your site doesn’t have a sidebar or if your sidebar has different dimensions, you can change this either by adjusting the settings in the WordPress Theme Customizer (Appearance > Customize), swapping out your theme for one with a sidebar, or editing the theme code.
- Have at least 10,000 monthly pageviews. Monumetric will need to review your Google Analytics account to ensure you meet the minimum traffic requirement and that your traffic is legitimate – i.e., not bot traffic. Note that Monumetric is interested in the pageview count, not the session count. (Some premium ad networks, such as Mediavine, require you to meet a minimum session count. A session can consist of multiple pageviews, so your pageview count will always be higher than your session count.) This is great news for smaller publishers who want to monetize their content with a premium ad network but don’t meet the minimum traffic requirements for certain networks.
- Be willing to implement a minimum of six ad slots on both desktop and mobile. That said, Monumetric offers a lot of flexibility in your overall ad strategy. If you try out a certain ad type and decide it’s not a good fit for your site, you can request the team to make changes at any time. Although all ads will slow down your website at least a little – and, in the case of some ad networks, a lot – a Google search turns up very few, if any, complaints from bloggers about site performance when using Monumetric.
- Have your site approved by Monumetric’s advertising partners. Your site will go through an initial screening period to ensure it meets the criteria of multiple advertisers. The more advertisers who say yes to your site, the more it drives up bidding among advertisers competing for your ad space. This is what increases your revenue per ad.
- A minimum of 50% of your traffic must come from the United States, United Kingdom, Canada, and Australia. Ad partners want to advertise to the demographics that spend the most money. Sixty-four percent of the traffic generated by Monumetric’s publishers comes from the United States.
Even if your site meets these minimum requirements, there’s no guarantee that your application will be approved. Quality content and high user engagement should always be your priority when preparing to apply to any premium ad network.
To maximize the chances of getting your site approved, make sure your site doesn’t have any of the following red flags, which can disqualify you from any ad network. These include:
- Low visitor engagement
- Site inactivity or infrequently updated content
- Technical problems such as 404 errors
- Unoriginal or plagiarized content
- Fraudulent traffic, such as bot traffic
- Inappropriate content (NSFW, hate speech, anything illegal)
If your site is approved, you’ll need to pay a one-time $99 implementation fee. Rest assured, you’ll make this money back in short order.
How to apply for Monumetric

The application and onboarding process with Monumetric was very simple. That said, most people report that it takes a few weeks, as there is some email back-and-forth with the team as well as a waiting period while their ad partners review (and hopefully approve) your site.
In my case, the whole process took three and a half weeks, from filling out the online application to having my custom ad strategy live on the site.
Here’s how the application and onboarding process works, from start to finish.
1. Online application form
You start the application process by filling out the online application form. You’ll need to provide your name, email address, and website URL.
Then you’ll need to connect your Google Analytics account so the Monumetric team can verify that you’ve had at least 10,000 page views in the last 30 days and that at least 50% of your traffic originates from the US, UK, and Canada.
2. 30-minute video call
Once the team has confirmed that your website meets the minimum requirements based on your Google Analytics data, you’ll schedule a 30-minute video call with a Monumetric team member.
During this call, you’ll discuss goals and strategy with your rep, and they’ll show you an initial mockup of their suggested ad strategy (superimposed on your own site). This call is a great opportunity to bring up any initial questions or concerns that you may have.
3. Wait for approvals
At this point, your site is submitted to Monumetric’s ad partners for review and there’s a bit of a waiting period while your site is approved by the right number of advertisers. According to the rep I spoke with, this period can last one to three weeks, as some of the advertisers approve sites in batches. For me, the wait was just under two weeks.
4. Review and approve your custom ad strategy
When your site has received enough approvals to move forward, you’ll have another opportunity to review a mockup of your ad strategy on desktop and mobile and either approve it or request changes before it goes live on your site.
Your ad strategy is customized to your site design and the goals you discussed with your rep on the call. It’s designed to get the most revenue for you while still providing a good user experience.
That said, you have the ultimate say when it comes to your strategy. For instance, you may decide not to use certain ad types, such as above-the-fold, video, or interstitial ads. Or you may choose to exclude ads entirely from certain pages on your site.
5. Provide admin credentials for your site
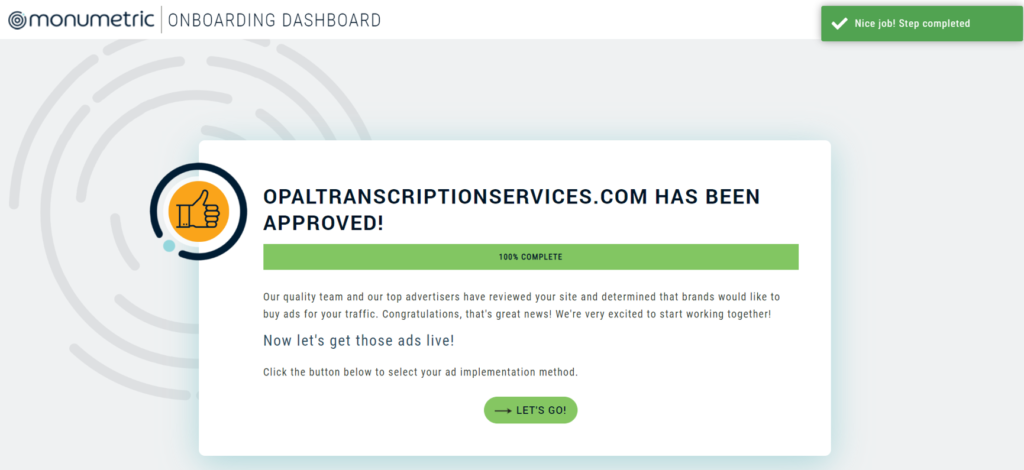
Once you’ve approved your custom ad strategy, it will be submitted to the Monumetric team, who will build your ad tags. You’ll need to log into your onboarding dashboard to provide admin credentials for your WordPress site so the team can install their plugin and begin implementation. (You’ll want to create a new WordPress user for this purpose.) At this point, you’ll also pay the one-time $99 implementation fee.
In my case, the implementation took less than 24 hours.
6. You’re live!
Now that your ads are up and running, you can look them over on your actual site. Again, at this point – and at any point in the future – you can request changes to your ad strategy. (I did request a couple of minor changes at this point, which were implemented within a day.)
At this time, your publisher dashboard will be activated so you can sign in at any time to monitor your stats and earnings. You’ll also be introduced to the support team, who are there to help you any time you have a question or want to request changes to your ad strategy.
7. Ramp-up period
Finally, it’s important to note that there is a “ramp-up” period of around 30 days, during which time your RPMs will be lower while 1) the team troubleshoots any problems with your custom ad setup and 2) advertisers test out your website and determine their ad spend.
And that’s it – you’re onboarded! From this point forward, the support team will get in touch with you from time to time with suggestions for optimizing your RPM and increasing your revenue.
Wrapping up
Monumetric’s requirements for publishers are more accessible than some other premium networks like Mediavine and AdThrive, yet they offer higher RPMs than entry-level ad platforms like Google AdSense. If you’re ready to take the next step with your blog and earn more money from your ad impressions, I highly recommend signing up.


